
Gluten Free Dutch Oven Bread Recipe
Updated Jan 02, 2026, Published Jun 27, 2024
This post contains affiliate links. Please see our disclosure policy.
Crispy Crust, Tender Crumb
Nothing says comfort like a freshly baked loaf of bread — especially when it’s gluten-free, golden-crusted, and tender inside. With a Dutch oven, you can achieve artisan-style results right at home, using steam and radiant heat to create a beautifully browned exterior while keeping the interior soft and flavorful.
Whether you’re a seasoned gluten-free baker or new to baking with alternative flours, this method brings bakery-quality bread to your countertop.
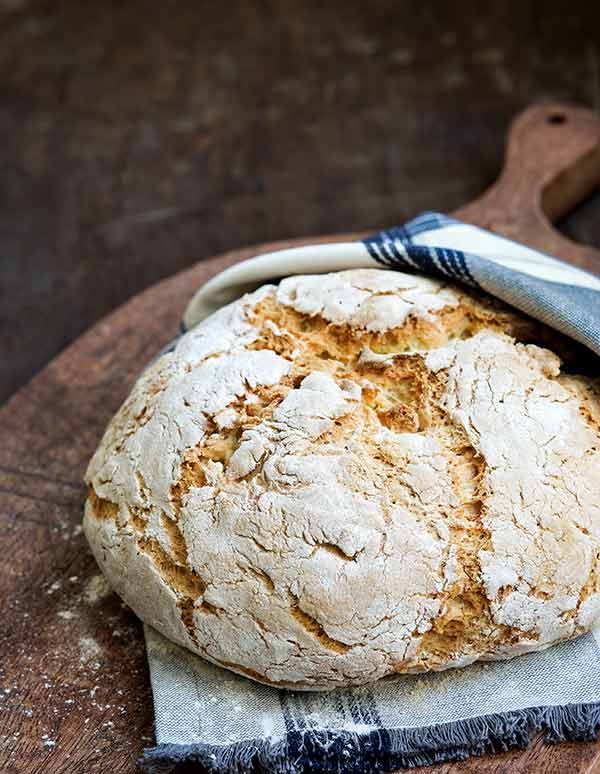
Table of Contents
- Crispy Crust, Tender Crumb
- Why Bake Bread in a Dutch Oven?
- Ingredients That Make Great Gluten-Free Bread
- How the Dutch Oven Method Enhances Gluten-Free Bread
- Serving Suggestions and Pairings
- Storage and Reheating Tips
- Common Baking Challenges and Solutions
- Why Gluten-Free Bakers Love This Method
- Gluten Free Dutch Oven Bread Recipe
Why Bake Bread in a Dutch Oven?
The Science Behind the Perfect Crust
Baking bread in a Dutch oven creates a steamy environment that mimics professional steam ovens. As the dough bakes, moisture releases from the bread and becomes trapped under the Dutch oven lid. This steam:
- Intensifies crust color
- Improves texture and chew
- Helps the loaf rise evenly
That crisp, crackly exterior is one of the hallmarks of Dutch oven bread — and it’s achievable even with gluten-free flours.
Gluten-Free Bread That Actually Works
Gluten-free bread can be challenging because it lacks the structure gluten normally provides. When baked in a Dutch oven, however, the combination of steam and radiant heat helps gluten-free dough rise more consistently and develop appealing texture without collapsing.
Ingredients That Make Great Gluten-Free Bread
Key Components for Structure and Flavor
While the full ingredient list is in the recipe itself, the backbone of this bread includes:
- Gluten-free all-purpose flour
- Active yeast (make sure your yeast is fresh and active)
- Eggs and olive oil for richness
- Xanthan gum or similar binding agent such as psyllium husk powder – 1 teaspoon for every cup of gluten-free flour mixed with the warm water the yeast was proofed in
These ingredients work together to replace the elasticity normally provided by wheat flour, helping the bread rise and hold its shape.
Tips for Flour Choices
Not all gluten-free flours perform the same. Many bakers find success using a measure-for-measure gluten-free blend that contains a mix of rice flour, tapioca starch, and other elements designed for baking.
You can also experiment with different blends — just be consistent and take note of how each affects the dough’s texture and rise.
How the Dutch Oven Method Enhances Gluten-Free Bread
Preheating the Pot
One big advantage of the Dutch oven method is that you preheat the vessel before adding the dough. Heating the pot ensures:
- Instant steam generation
- Maximum oven spring
- Proper crust formation
Preheating the Dutch oven while the dough rises means the loaf hits a hot environment right away, which improves texture and flavor.
Creating Steam for Crust Development
The trapped steam mimics the environment in professional bread ovens. This results in:
- A deeply browned, crisp crust
- A chewy, satisfying bite
- A soft, moist crumb inside
This technique is why so many bakers switch to Dutch oven bread when they want a loaf that performs like bakery bread at home.
Serving Suggestions and Pairings
Best Ways to Enjoy Gluten-Free Bread
Freshly baked gluten-free Dutch oven bread is incredibly versatile. Try serving it with:
- Olive oil and balsamic for dipping
- Creamy spreads or herb butter
- As the base for hearty sandwiches
- Alongside soups or stews on cooler days
It also pairs beautifully with homemade gluten-free soup recipes or shared boards featuring artisan cheeses and spreads.
Storage and Reheating Tips
To keep your bread fresh:
- Store at room temperature in a bread box or linen bag
- Freeze sliced portions for up to 3 months
- Refresh leftover slices in the oven or toaster for best texture
Common Baking Challenges and Solutions
Dough Texture Doesn’t Look Right
Gluten-free dough often looks wetter or more batter-like than wheat dough — that’s normal. Instead of kneading like traditional bread, gluten-free dough gets structure from hydration and steam in the Dutch oven.
Bread Doesn’t Brown Enough
If your loaf isn’t browning as deeply as you’d like, make sure your Dutch oven was preheated thoroughly and consider slightly longer bake time after removing the lid. Trapped steam is essential early, but removing the lid partway through baking contributes to that rich golden color.
Why Gluten-Free Bakers Love This Method
Many gluten-free bread lovers say Dutch oven bread gives them texture and flavor that’s hard to replicate with other methods. The steam and heat combine to give structure, aroma, and a satisfying bite — without gluten’s natural properties.
Whether you bake gluten-free bread regularly or you’re searching for a loaf that comes out beautifully every time, the Dutch oven method is worth mastering.
Want to be more adventurous? Try Gluten-Free Sourdough Bread.
Shop This Post


Gluten Free Dutch Oven Bread Recipe
Ingredients
- 2 tablespoons dry active yeast
- 2 teaspoons sugar
- 1½ cups warm water, 105°F
- 1 tablespoon xanthan gum
- 2 tablespoons olive oil
- 3 cups gluten-free all-purpose flour, with or without xanthan gum, plus more for dusting
- 2 teaspoons kosher or fine sea salt
- 2 large eggs, lightly beaten
- 1 teaspoon apple cider vinegar
Instructions
- Place a Dutch oven with the lid on in the oven and preheat the oven to 450°F. (Keep the pot in the oven while the bread rises.)
- Combine the yeast, sugar, and warm water in a bowl about twice the size of the mixture and whisk to dissolve the sugar. Let sit until it is foamy and doubled in size, 5-6 minutes. In a small bowl, stir the xanthan gum with the olive oil until the xanthan gum is dissolved.
- Combine flour and salt in the bowl of an electric mixer fitted with a whisk or paddle attachment (or just the regular beaters – do not use a dough hook). Mix to combine. Add the yeast mixture, xanthan gum mixture, eggs, and vinegar and mix on low to combine. Scrape down the sides and bottom of the bowl once. Turn the mixer to high and mix for 3 minutes.
- Place a piece of parchment paper on a flat surface and dust it with flour. Scrape the dough onto the parchment paper. With wet hands, shape into a dome that will fit in the pot. Cover with a bowl and let rise until doubled in size, about 45 minutes. Cut 1-inch deep slits into the top of the dough to allow the steam to escape. Dust the top with a little flour.
- Carefully remove the pot from the oven and remove the lid. Lift the parchment with the dough on it and lower into the pot. Replace the lid and bake for 45 minutes. Remove the lid and allow to bake for another 10-15 minutes or until the bread is nicely browned. Lift out the paper with the bread on it and place on a wire rack to cool.
Notes
Nutrition
Nutrition information is automatically calculated, so should only be used as an approximation.
This delicious recipe graced the cover of the September/October 2017 issue of Gluten Free & More Magazine!


Is the temperature on this recipe correct? My bread was burnt to a crisp…
Hi CJ,
Yes, the temperature is correct. You may want to get a separate oven thermometer and check to see if your oven is running too hot. If it’s true to temperature, I’m not sure why it burned. Climate or altitude can sometimes cause differences in baking but we’ve had a lot of people try this and it has always turned out as expected. If you try it again, maybe reduce the oven temp and/or baking time and see how it goes; just make sure it’s cooked through.
xo,
Carol
An hour at 450?? That seems quite long. I’d believe at 405 if it were a typo…
Hi Dan,
450 is the correct temp
Just made your recipe. It looks great and love how much it rose! Thank you for sharing.
Hello if flour has xanthan gum do you still add the tablespoon?
Hi Diane, yes, you will still need to add the xanthan gum in this recipe.
Unfortunately I have to agree with many of these posts that either the temperature or (something else) must be off. It is a total disaster and totally burnt!!
Hi Anne,
Are you at a high altitude? I’ve gotten a lot of people who say this recipe works perfectly and I’ve made it several times with no issue, so I’m trying to see if there’s a common thread between the people who say it didn’t work for them. Let me know if you did anything different from the recipe, used any ingredient substitutions, and/or are at a high altitude or a dry climate (I’m in Florida so perhaps humidity is at play here?).
Temperature worked for me. My only issue is My knife wasn’t very sharp and sort of got stuck and the bread deflated a bit into the middle. Haha human error.
I have a convection oven so I always set it 25^ lower. I also have a separate oven temperature to check so when my oven is set at 425^ on convection setting, the internal temperature is 450^. My bread came out nicely cooked with a light crust on top.
We’ve made the bread many times – that temperature is correct; we even had to extend it 10 mins for the last loaf we made (the sticky was a bit stickier than it should have been). We’ve begun doing an egg wash on top and adding fresh rosemary (or mixed herbs) for an even tastier bread. Next time we’re adding sea salt crystals to the crust as well – salt is a bit lacking within the bread itself.
When do you do the egg wash? Before it goes in the oven or after? Do you still sprinkle the flour on top? What about sprinkling cheese on top? Or a garlic herb mix?
Was wondering what GF flour everyone used. Loved the texture of the bread but disliked the flavor. The one I got it’s main ingredient was chick peas. Trying to perfect this for my mom! Thank so much.
I used my own gluten-free all-purpose flour. Another reader mentioned using King Arthur. Both of these flours contain ingredients like rice flour, tapioca starch, etc. I haven’t tried this with a bean/chickpea based flour.
Hi Sharon! I’ve tested all kinds of gluten free flours/flour blends throughout the years and I agree-chickpea based doesn’t usually taste great. My absolute favorite is the Bob’s Red Mill 1:1 gluten free flour mix. The packaging is blue. :)
I have not tried this recipe … however, I have baked many loaves of No Knead Bread and found that in my gas oven, which is not oversized, I had to place a cookie sheet on the very bottom shelf of the oven. The cookie sheet being about an inch from the bottom of the oven deflects the heat from the bottom of the Dutch Oven and I put an extra sheet of parchment in the bottom of my Dutch Oven, depending on the recipe.
I bake at 450 for 30 minutes, then, with moist, heavy breads, I bring the loaf out of the oven, tap the bottom and if it does not sound hollow, it isn’t done. At that point I will bake it for another 10 minutes, lid off, bring it out of the Dutch Oven and place it directly on the oven shelf for another 10 minutes with the oven off. This is a much gentler approach to baking No Knead Bread and it works for me. So with that said, I am going to try once again, to bake a terrific loaf of GF bread for my husband…and hope that it isn’t a brick like so many in the past!
What blend of gf flour did you use?
Hi Fyvonne,
I use my own brand of gluten-free flour. You can find it on Amazon here.
xo,
Carol
Is two Tablespoons of yeast correct? I’m used to two Teaspoons! Thanks
Yes two tablespoons of yeast!
Is it correct that a slice of this GF Dutch Oven bread is 1664 calories?
Hi Joy,
No, that number is for the entire loaf. The nutrition facts is calculated based on the section that says “Servings” under Course and Cuisine at the top part of the recipe. It says 1 loaf, so this is calculating the entire loaf (which of course is not ideal, but the serving size in this case would depend on how large you slice the bread). Typically it works out better than this. For example, if it were a cupcake recipe, it would say “Servings: 12 cupcakes” and would calculate the nutrition facts and divide it by 12, but since it says “1 loaf” it isn’t dividing it into multiple servings. I hope that makes sense.
I tried to cut it at he top but it couldn’t really cut through because it was a bit moist! Don’t know what went wrong!
Hi Sarah,
I’m sorry to hear that! Did you let it cool down enough before cutting into it? And did you let the Dutch oven heat up while the oven preheated? I’m not sure what else may have caused that. Did you differentiate the ingredients or amounts at all?
Was so glad to find this site and recipe for Dutch Oven Bread. We are living in Turkey presently for work, and there is little gluten free items. I found a good cup for cup blend I can make with the flours/starches available here (which isn’t a lot) and today I made your recipe and it looks and smells wonderful. Still cooling so waiting to cut it. Thank you so much for sharing.
Is it possible to make this without eggs (using flax eggs or aquaphaba instead)?
Hi Caitlin,
Unfortunately, I haven’t tried an egg-free version of this bread.
Caitlin, did you ever try this with an egg substitute? That is the same question I had!
Hi, I used flax eggs as my family doesn’t eat animals. It worked nicely. Flax is also a sub for xanthan gum so I’m going to bake it again and see if I can get away with just the flax instead of both.
Was so glad to find this site and recipe for Dutch Oven Bread. We are living in Turkey presently for work, and there is little gluten free items. I found a good cup for cup blend I can make with the flours/starches available here (which isn’t a lot) and today I made your recipe and it looks and smells wonderful, looks wonderful and the texture is amazing and the taste excellent. Is it possible to add some herbs to it in the mixing phase if we wanted an Italian Herb Bread? Thank you for all your time spent developing this recipe. It’s a life saver! Makes my tummy happy!!
Hi Sherry,
I’m so happy you like it! Yes, I think adding some herbs would be great. Let me know what herbs you do and how it turns out, I’ve love to let other readers know about your results.
xo,
Carol
We are planning to try this recipe, but you didn’t specify what size of dutch oven to use. What size works best we have a 5.5 qt and a much larger one.
Hi Denise,
Sorry about that! I’ve added that info to the recipe. I used a 10 inch wide, 4 inch deep Dutch oven.
Hello! I am excited to try this recipe, but I don’t have a dutch oven. I have a cast iron pot (with lid) that is similar in size. Would that work?
Hi Teresa,
Yes, that would work. I hope you enjoy it!
xo,
Carol
Question if I am using a gluten free all purpose blend that includes xanthan gum do I exclude the 1 TB of xanthan gum in your recipe
Hi Fran,
Yes, you still add the xanthan gum to this recipe.
I’m assuming this is a cast iron Dutch oven–I have an enamel one that I don’t think is suitable for that high a temperature. Would anything else work?
Hi Boelle,
I used a cast iron Dutch oven that has enamel over it when I made this, and I had no problem! If yours isn’t suitable for that high of a temperature than yes, you can use a regular cast iron Dutch oven. Hope this helps!
xo,
Carol
Has anyone had success adjusting this for high altitude? I just made it and it’s so promising but didn’t rise right. It started out rising nicely but then collapsed (still during the rising phase).