Gluten Free Dutch Oven Bread Recipe
Published Jun 27, 2024
This post contains affiliate links. Please see our disclosure policy.
A Dutch oven is the perfect vessel for baking bread that has a crispy, golden crust and tender crumb. The almost magical transformation of the dough is thanks to the searing heat and steam created in the pot while it preheats. Baking gluten-free bread has never been easier or more rewarding.
I used my own gluten-free all-purpose flour for this recipe, but feel free to use your favorite gluten-free all-purpose blend.
Love to bake? See more gluten-free bread recipes, gluten-free dessert recipes, and gluten-free cookie recipes.
Shop This Post

Gluten Free Dutch Oven Bread Recipe
Ingredients
- 2 tablespoons dry active yeast
- 2 teaspoons sugar
- 1½ cups warm water, 105°F
- 1 tablespoon xanthan gum
- 2 tablespoons olive oil
- 3 cups gluten-free all-purpose flour, with or without xanthan gum, plus more for dusting
- 2 teaspoons kosher or fine sea salt
- 2 large eggs, lightly beaten
- 1 teaspoon apple cider vinegar
Instructions
- Place a Dutch oven with the lid on in the oven and preheat the oven to 450°F. (Keep the pot in the oven while the bread rises.)
- Combine the yeast, sugar, and warm water in a bowl about twice the size of the mixture and whisk to dissolve the sugar. Let sit until it is foamy and doubled in size, 5-6 minutes. In a small bowl, stir the xanthan gum with the olive oil until the xanthan gum is dissolved.
- Combine flour and salt in the bowl of an electric mixer fitted with a whisk or paddle attachment (or just the regular beaters – do not use a dough hook). Mix to combine. Add the yeast mixture, xanthan gum mixture, eggs, and vinegar and mix on low to combine. Scrape down the sides and bottom of the bowl once. Turn the mixer to high and mix for 3 minutes.
- Place a piece of parchment paper on a flat surface and dust it with flour. Scrape the dough onto the parchment paper. With wet hands, shape into a dome that will fit in the pot. Cover with a bowl and let rise until doubled in size, about 45 minutes. Cut 1-inch deep slits into the top of the dough to allow the steam to escape. Dust the top with a little flour.
- Carefully remove the pot from the oven and remove the lid. Lift the parchment with the dough on it and lower into the pot. Replace the lid and bake for 45 minutes. Remove the lid and allow to bake for another 10-15 minutes or until the bread is nicely browned. Lift out the paper with the bread on it and place on a wire rack to cool.
Notes
Nutrition
Nutrition information is automatically calculated, so should only be used as an approximation.
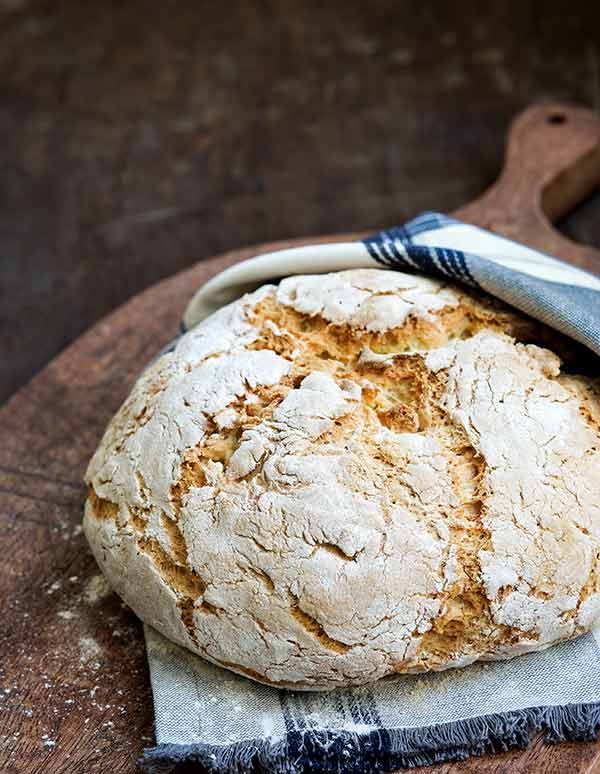
This delicious recipe graced the cover of the September/October 2017 issue of Gluten Free & More Magazine!
Get a subscription to Gluten Free & More Magazine or order the September/October 2017 back issue.







Very good. Baked in caphalon pan with the glass cover. Browned beautifully after 35-40 minutes of baking. Never had to continue baking without the cover. It had a taste that reminded me of rye bread. Maybe I’ll add caraway seeds next time. Delicious and easy! Nancy
Hello! Thanks for the recipe. My yeast bowl never doubled, therefore my dough never doubled. It’s in the oven now, guessing it’ll be a tough loaf. Any tips or suggestions on yeast? I used red star. Maybe my water was too warm?
Hi Roin,
My first question is was your yeast fresh or could it possibly have been expired? Second, the water should be about 105 degrees F. Are you able to measure your water temperature next time if you didn’t measure the temp this time?
I substituted honey for the sugar.
This is the best GF bread I have ever had!!!
Thank you for this recipe, 2 of my children have Celiac disease
so I will makeit often.
I’m trying this recipe right now! My yeast/sugar/water mix did not double in size & I let it sit for quite a bit. Whenever I use yeast/water mixture I’ve never seen it size up as you mention. Any suggestions on that? Unfortunately, my consistency is really gummy & not like usual dough so I’m assuming that may be what threw it off. May add more flour before I bake it.
Hi Lauren,
Was your yeast fresh or could it possibly have been expired? And did you make sure to use water that was 105 degrees?
hello, for some reason my bread did not rise……don’t know why? any thoughts?
Hi Rosemary,
This usually happens if the yeast is too old or if the water is too cold or too hot. Any idea if the yeast you used may be expired? And were you able to ensure the water was 105 degrees?
I followed the directions completely and the dough was the consistency of thick pancake batter I added more flour and it was halfway between cookie dough and pancake batter I transferred it to a bowl with parchment paper. I’m hopeful it will at least bake properly in the Dutch oven.
Hi Jennifer,
I’m sorry to hear that. Did it bake properly? Either way, let me know what kind of flour you used and let’s see if we can troubleshoot what might have went wrong.
Hi Carol! I’m not sure what went wrong the first time. I tried it again today and it is perfect! I did add an extra 1/2 cup of flour, because it was a little wetter than I hoped. That made it the perfect consistency. I used King Arthur GF flour both times. All ingredients were the same. So, I’m at a loss.
I will be making this again. And again!
Hi Jennifer! I’m so glad it worked out for you this time. I’m not sure what went wrong the first time either. Perhaps the weather (humidity levels, etc.) could have played a role, or the temperature of your ingredients. Occasionally you can get air pockets in your measuring cup if you don’t pack the ingredient in a little bit – perhaps that happened the first time, leaving you with not enough flour in the batter? It’s hard to tell, but either way I’m very happy it worked this time and I hope it continues to work out well each time you try it! :)
I loved this bread…still adjusting to flavor of crust…….. but great!!! Gave 4 loaves away to neighbors, they loved it too! And they don’t even eat a GF diet :-)
Only 1 question, If I should cut this recipe in half (for 1 person), do I keep the baking time at 55 minutes??
45 min + 10 browning time
Thank You
Love it!!
Deb
Hi Debbie,
I’m glad you like it! On the timing for a half portion of the recipe, I’m not entirely sure so I’d recommend you start checking it about 15 minutes before the original time is up.
Is 2 Tablespoons of yeast correct? That seems like too much.
Hi Laurie,
Yes, 2 tablespoons is correct.
This came out exactly as described and was amazing! (North Carolina, so no altitude adjustments). Thank you for sharing.
I noticed no one has specifically asked about additive measurements you might suggest. For example, if I want to make it a garlic rosemary style (which I’m about to do :)), how much garlic powder would you recommend? And dried rosemary? I already know how much rosemary I can add for a hint. But just curious how much of each you might add? Or any other additive measurement suggestions (seeds etc)?
Again, thanks. I’m going to save this for offline use in case this page ever disappears!
Alex
Hi Alex,
I’ve never made this with any add-ins myself and I often eyeball things until I have to write down my recipes! You’d have to just play around with the ingredients a bit. Shouldn’t hurt to start with 1/2 tsp of garlic powder and 1/2 to 1 tsp dried rosemary, then see how well that mixes in and go from there.
I’m happy to hear the recipe turned out well for you, glad you enjoyed it!
xo,
Carol
Should the oven be on fan force or normal
It’s just normal
Carol – this is a fabulous recipe! I do not have a dutch oven so I had to compromise with using two loaf pans (one as a lid) and clipped together with office clips. I made two small loaves out of this recipe and baking them for 45 minutes straight through – it was perfect! Thank you so much for the recipe, I will experiment with different flour blends now. I also really appreciate that your recipe was right at the top of the page and I did not have to scroll down through your life story to get to it. Thank you for providing it straight away. Have a wonderful day and keep up the great work!
Thanks Monica! So glad you like it :)