
Gluten Free Dutch Oven Bread Recipe
Updated Jan 02, 2026, Published Jun 27, 2024
This post contains affiliate links. Please see our disclosure policy.
Crispy Crust, Tender Crumb
Nothing says comfort like a freshly baked loaf of bread — especially when it’s gluten-free, golden-crusted, and tender inside. With a Dutch oven, you can achieve artisan-style results right at home, using steam and radiant heat to create a beautifully browned exterior while keeping the interior soft and flavorful.
Whether you’re a seasoned gluten-free baker or new to baking with alternative flours, this method brings bakery-quality bread to your countertop.
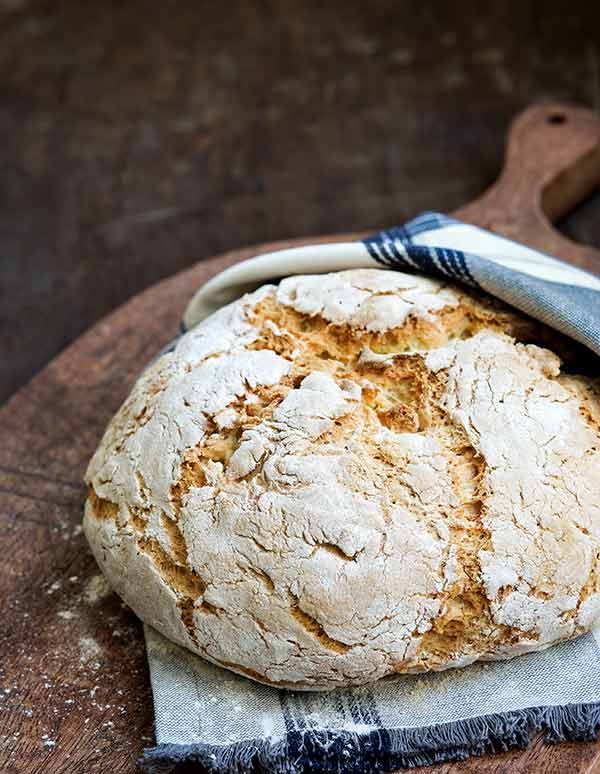
Table of Contents
- Crispy Crust, Tender Crumb
- Why Bake Bread in a Dutch Oven?
- Ingredients That Make Great Gluten-Free Bread
- How the Dutch Oven Method Enhances Gluten-Free Bread
- Serving Suggestions and Pairings
- Storage and Reheating Tips
- Common Baking Challenges and Solutions
- Why Gluten-Free Bakers Love This Method
- Gluten Free Dutch Oven Bread Recipe
Why Bake Bread in a Dutch Oven?
The Science Behind the Perfect Crust
Baking bread in a Dutch oven creates a steamy environment that mimics professional steam ovens. As the dough bakes, moisture releases from the bread and becomes trapped under the Dutch oven lid. This steam:
- Intensifies crust color
- Improves texture and chew
- Helps the loaf rise evenly
That crisp, crackly exterior is one of the hallmarks of Dutch oven bread — and it’s achievable even with gluten-free flours.
Gluten-Free Bread That Actually Works
Gluten-free bread can be challenging because it lacks the structure gluten normally provides. When baked in a Dutch oven, however, the combination of steam and radiant heat helps gluten-free dough rise more consistently and develop appealing texture without collapsing.
Ingredients That Make Great Gluten-Free Bread
Key Components for Structure and Flavor
While the full ingredient list is in the recipe itself, the backbone of this bread includes:
- Gluten-free all-purpose flour
- Active yeast (make sure your yeast is fresh and active)
- Eggs and olive oil for richness
- Xanthan gum or similar binding agent such as psyllium husk powder – 1 teaspoon for every cup of gluten-free flour mixed with the warm water the yeast was proofed in
These ingredients work together to replace the elasticity normally provided by wheat flour, helping the bread rise and hold its shape.
Tips for Flour Choices
Not all gluten-free flours perform the same. Many bakers find success using a measure-for-measure gluten-free blend that contains a mix of rice flour, tapioca starch, and other elements designed for baking.
You can also experiment with different blends — just be consistent and take note of how each affects the dough’s texture and rise.
How the Dutch Oven Method Enhances Gluten-Free Bread
Preheating the Pot
One big advantage of the Dutch oven method is that you preheat the vessel before adding the dough. Heating the pot ensures:
- Instant steam generation
- Maximum oven spring
- Proper crust formation
Preheating the Dutch oven while the dough rises means the loaf hits a hot environment right away, which improves texture and flavor.
Creating Steam for Crust Development
The trapped steam mimics the environment in professional bread ovens. This results in:
- A deeply browned, crisp crust
- A chewy, satisfying bite
- A soft, moist crumb inside
This technique is why so many bakers switch to Dutch oven bread when they want a loaf that performs like bakery bread at home.
Serving Suggestions and Pairings
Best Ways to Enjoy Gluten-Free Bread
Freshly baked gluten-free Dutch oven bread is incredibly versatile. Try serving it with:
- Olive oil and balsamic for dipping
- Creamy spreads or herb butter
- As the base for hearty sandwiches
- Alongside soups or stews on cooler days
It also pairs beautifully with homemade gluten-free soup recipes or shared boards featuring artisan cheeses and spreads.
Storage and Reheating Tips
To keep your bread fresh:
- Store at room temperature in a bread box or linen bag
- Freeze sliced portions for up to 3 months
- Refresh leftover slices in the oven or toaster for best texture
Common Baking Challenges and Solutions
Dough Texture Doesn’t Look Right
Gluten-free dough often looks wetter or more batter-like than wheat dough — that’s normal. Instead of kneading like traditional bread, gluten-free dough gets structure from hydration and steam in the Dutch oven.
Bread Doesn’t Brown Enough
If your loaf isn’t browning as deeply as you’d like, make sure your Dutch oven was preheated thoroughly and consider slightly longer bake time after removing the lid. Trapped steam is essential early, but removing the lid partway through baking contributes to that rich golden color.
Why Gluten-Free Bakers Love This Method
Many gluten-free bread lovers say Dutch oven bread gives them texture and flavor that’s hard to replicate with other methods. The steam and heat combine to give structure, aroma, and a satisfying bite — without gluten’s natural properties.
Whether you bake gluten-free bread regularly or you’re searching for a loaf that comes out beautifully every time, the Dutch oven method is worth mastering.
Want to be more adventurous? Try Gluten-Free Sourdough Bread.
Shop This Post


Gluten Free Dutch Oven Bread Recipe
Ingredients
- 2 tablespoons dry active yeast
- 2 teaspoons sugar
- 1½ cups warm water, 105°F
- 1 tablespoon xanthan gum
- 2 tablespoons olive oil
- 3 cups gluten-free all-purpose flour, with or without xanthan gum, plus more for dusting
- 2 teaspoons kosher or fine sea salt
- 2 large eggs, lightly beaten
- 1 teaspoon apple cider vinegar
Instructions
- Place a Dutch oven with the lid on in the oven and preheat the oven to 450°F. (Keep the pot in the oven while the bread rises.)
- Combine the yeast, sugar, and warm water in a bowl about twice the size of the mixture and whisk to dissolve the sugar. Let sit until it is foamy and doubled in size, 5-6 minutes. In a small bowl, stir the xanthan gum with the olive oil until the xanthan gum is dissolved.
- Combine flour and salt in the bowl of an electric mixer fitted with a whisk or paddle attachment (or just the regular beaters – do not use a dough hook). Mix to combine. Add the yeast mixture, xanthan gum mixture, eggs, and vinegar and mix on low to combine. Scrape down the sides and bottom of the bowl once. Turn the mixer to high and mix for 3 minutes.
- Place a piece of parchment paper on a flat surface and dust it with flour. Scrape the dough onto the parchment paper. With wet hands, shape into a dome that will fit in the pot. Cover with a bowl and let rise until doubled in size, about 45 minutes. Cut 1-inch deep slits into the top of the dough to allow the steam to escape. Dust the top with a little flour.
- Carefully remove the pot from the oven and remove the lid. Lift the parchment with the dough on it and lower into the pot. Replace the lid and bake for 45 minutes. Remove the lid and allow to bake for another 10-15 minutes or until the bread is nicely browned. Lift out the paper with the bread on it and place on a wire rack to cool.
Notes
Nutrition
Nutrition information is automatically calculated, so should only be used as an approximation.
This delicious recipe graced the cover of the September/October 2017 issue of Gluten Free & More Magazine!


I made this tonight and it is divine! Crispy on the outside and fluffy inside, it’s hard to even tell this is GF. Thank you for this recipe, I will make it again.
I just wanted to let you know that my Vegan & GF parter LOVES this bread (he said it’s the best he’s ever had – and ate half a loaf the first time). I have indeed used two different egg-replacers! Follow Your Heart Vegan Egg, as well as Ener-G Egg Replacer. I have NOT made this with regular eggs so I can’t really attest to the difference between. The first time I made this, I just used straight 3 packets of Red Star Active Dry Yeast, so it may have worked a bit better with lots of yeast and the egg replacer together. I only had to do about 45 mins covered for it to be pretty crusty & brushing some vegan margarine on top before fully cooled made it even more delicious.
Thanks, Helena! This is great to know for people who can’t have eggs.
Can I make this recipe with instant yeast instead of active dry? Is it possible? Thank you!
Can you make this with instant yeast instead of active dry? It’s all I have.
I haven’t tried this with instant yeast, only active dry yeast.
My bread didn’t rise much, but it still turned out amazingly.. fairly moist inside (so toasting was perfect) with a beautiful crust. Thank you thank you for this! Some of the best GF bread I have had since my celiac diagnosis.
Living in New Zealand the gluten free range is expensive but after finding this little gem online my son is very happy with the finished product, thank you for this amazing recipe.
I cooked it 45 minutes only covered in a Dutch oven. It didn’t need the extra 15 uncovered. I added roasted garlic and rosemary. I also used instant yeast which worked fine.
What a great and easy recipe. Thank you!
The only thing I did differently was that I added an additional teaspoon of xanthan gum for each cup of flour into the dry ingredients bowl, on top of the one tablespoon with the olive oil that the recipe asked for. The recipe also said 45mins with lid on, then an additional 10-15 without lid. I didn’t do the additional without lid timing because it looked done (golden colour and inside was perfect when we cut into it). I also didn’t have any parchment paper, so I skipped using it all together. After the rise in the mixing bowl, I sprinkled the hot dutch oven with some flour then tipped the mixing bowl mixer slowly into it, followed by a scoring and another light flour on top before the full 45min cook.
it was a hit
I am making this now…Do we need to let this cool completely before slicing into it?
Hi Lyla,
Yes, you should let the loaf cool before slicing into it. It can be warm still, just not straight out of the oven.
Thank you! I have tried many GF no knead breads and this is the first to work. I’m sorry that I can’t attach a picture.
This bread was excellent. I had no problem. I know my oven can be goofy so I checked on it at 40 mins. There was not need to take the lid off and brown an additional 10 mins as it was perfect. Crunchy and toasted on the outside, soft and chewy inside. The only question I have is the Xantham Gum…My GF flour contains Xanthum Gum. Is adding the additional TBSP too much. I have read that it can cause stomach upset. Thanks. My husband and I Love this bread.
Hi Elaine,
Yes, you would still add the additional tbsp xanthan gum. If you find it upsets your stomach you could use a flour blend without xanthan gum, still add the 1 tbsp, and see if that helps. There are other gums you might be able to try too, but I haven’t tested them with this recipe myself.
I’m glad you and your husband like the bread!
xo,
Carol