
Gluten-Free Rudolph Cookies
Updated Dec 01, 2025, Published Oct 18, 2021
This post contains affiliate links. Please see our disclosure policy.
Cute, Festive Holiday Sugar Cookies
When the holidays roll around, sometimes you want more than just the usual cookies — you want a treat that brings a smile before the first bite. Gluten-Free Rudolph Cookies deliver on that. These cheerful sugar cookies, shaped like little reindeer with bright red noses, add a playful, festive touch to your holiday baking.
Whether you’re prepping for a cookie exchange, gifting neighbors, or setting out a platter for family movie night, these cookies bring joy (and sweetness) to any winter celebration.
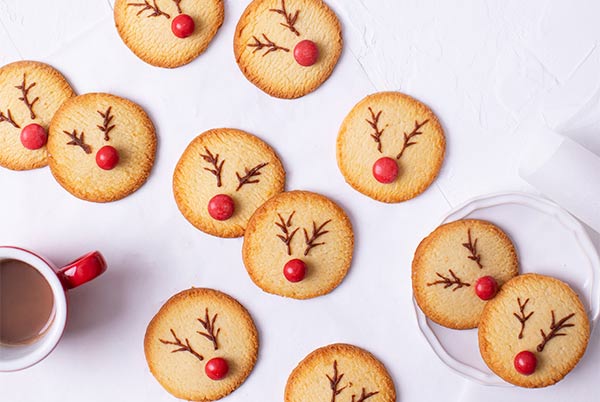
Table of Contents
Why Rudolph Cookies Are a Holiday Favorite
Festive & Playful:
With a red “nose” and antler-like decorations, these cookies instantly evoke holiday cheer. They’re as fun to look at as they are to eat.
Gluten‑Free and Inclusive:
Because the dough uses gluten-free flour, they’re a great option if you’re baking for friends or family who avoid gluten — without compromising flavor or charm.
Easy Enough for Busy Holidays:
The recipe is straightforward, with simple ingredients and uncomplicated steps. Even busy holiday schedules won’t stop you from baking these delights.
Perfect for Sharing or Gifting:
They travel well, store nicely, and make adorable homemade gifts or cookie-box inclusions.
What You’ll Need
To prepare Rudolph Cookies, here’s a general guide to the ingredients and items you’ll want on hand:
Typical Ingredients & Decorations
- Butter (softened), powdered sugar, a little granulated sugar — for a classic cookie base
- Gluten‑free all-purpose flour blend — the heart of keeping the cookies gluten-free
- An egg — to bind the dough
- Ground hazelnuts and a pinch of cinnamon — for subtle flavor and a tender crumb
- Melted chocolate (for “antlers” and eyes) and red sugar pearls or candy for noses — the decorating touches that make the Rudolph look complete
Essential Tools & Prep Needs
- A rolling surface and a round cookie cutter (or similar cutter) to shape the cookies before baking
- Parchment paper or a lined baking sheet — for easy baking and cleanup
- A toothpick or small tool for decorating with melted chocolate and placing the candy noses neatly
Having these ready ensures the baking and decorating process stays smooth and festive.
When to Bake and Share Rudolph Cookies
These cookies fit wonderfully into a variety of holiday occasions:
- Christmas cookie exchanges with friends or neighbors
- Holiday parties — children and adults alike love the fun reindeer design
- Gifting — pack them up as homemade presents or add them to holiday cookie boxes
- Family holiday nights — ideal for setting out with milk or cocoa after decorating the tree or watching a festive movie
Tips & Decorating Variations to Make Them Your Own
Tips for Baking Success
- Chill the dough before rolling out — this helps the cookies hold their shape and bake evenly.
- Work in batches if needed — especially when rolling and cutting, to keep dough from warming too much.
- Let cookies cool fully before decorating — melted chocolate and candy noses stay neat when the surface is cool.
- Store in an airtight container — they stay fresh for several days, perfect if you’re baking ahead.
Fun Decoration & Variation Ideas
For a nut-free version, simply skip the ground hazelnuts and use a nut-free flour blend to suit allergies, while keeping the dough flavorful.
Chocolate lovers can go all in by using dark chocolate for the antlers and eyes, drizzling extra chocolate on top, or even sandwiching two cookies together with a chocolate spread.
To add extra holiday cheer, swap out some of the classic red candy noses for a mix of red and festive-colored candies to make each Rudolph unique.
For a bite-sized option, roll the dough thinner and use a small cutter to create mini Rudolphs, perfect for cookie platters or kids.
You can also add warm holiday flavors such as orange zest, cinnamon, or nutmeg to the dough for a seasonal twist.
Finally, make them gift-ready by layering cookies with parchment paper in a holiday tin or decorating clear bags with ribbon for delightful handmade presents.

Rudolph Cookies
Ingredients
- ½ cup (115 g) unsalted butter, , softened
- ⅖ cup (50 g) powdered sugar
- 2 tablespoons (25 g) granulated sugar
- 2 cups (240 g) gluten-free all-purpose flour
- 1 large egg, , lightly beaten
- 3 tablespoons (18 g) ground hazelnuts
- ½ teaspoon (1.3 g) ground cinnamon
- ½ teaspoon (2.5 mL) pure vanilla extract
For decoration:
- 3 tablespoons (45 mL) milk chocolate, , melted
- 20 gluten-free red sugar pearl sprinkles or cinnamon imperial candy
Instructions
- Preheat the oven to 360°F.
- Beat the butter and powdered sugar using a mixer for 5-7 minutes. Add granulated sugar and sift in the gluten-free all-purpose flour. Mix for 2 minutes. Add egg, ground hazelnuts, cinnamon, and vanilla extract. Knead into a ball with your hands. Wrap in plastic wrap and refrigerate for 1 hour.
- Spread the dough onto a floured surface and roll out to about ⅓ inch thick. It’s best to work in batches and keep the rest of the dough in the fridge. Cut out as many cookies as will fit with a round cookie cutter.
- Transfer to a baking sheet lined with parchment paper and bake for 15 minutes. Cool before decorating. Using a toothpick dipped in melted chocolate, make a deer horn-like decoration on each cookie. Then, make a drop of chocolate on each cookie where the nose should be and immediately glue a red nose from sugar pearl sprinkles or cinnamon imperial candy in its place. Set aside to firm before serving.
Nutrition
Nutrition information is automatically calculated, so should only be used as an approximation.


Dough was so dry and flaky it was impossible to knead, and then as tough as a bowling ball after being refrigerated. I followed the recipe to a T!