
This post contains affiliate links. Please see our disclosure policy.
First of all, I have to come clean here on this gluten free recipe – I haven’t actually tasted “regular” brioche since going gluten free almost 2 decades ago, so I had to rely on references to what brioche should be like to know if this recipe came close.
So I did my homework and determined the characteristics of brioche then compared my version to what my research turned up. In fact, this is how my gluten free brioche recipe was developed.
- Yeast bread enriched with butter and eggs… Check.
- Slightly sweet… Check.
- Tender crumb… Check.
- Dark golden crust… Check.
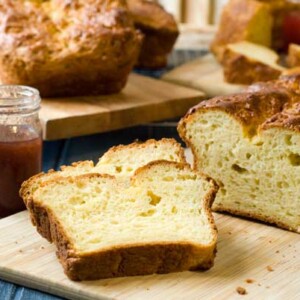
Is this brioche just like one you would buy from a bakery in Paris? I don’t know. What I do know is that this recipe for gluten free brioche is absolutely delicious!
It produces a rich loaf of bread that is not too soft and not too dense and that lasts for days! Perfect for sandwiches, French toast and bread pudding. Perfect just sliced and eaten (especially warm).
I had seen a recipe going around the internet for Brioche, however the copious amounts of cornstarch turned me off and the recipe lacked eggs which, along with butter, is what makes brioche, “brioche!” I can understand subbing-out dairy free butter for the butter but I can’t see how a bread recipe without eggs can be considered brioche. It may be lovely bread but I am not sure I would call it brioche—at least not when compared to this gluten free brioche recipe which uses all the traditional ingredients.
So I went and studied traditional brioche recipes, came up with a plan and then I tested and tested and tested – painstakingly changing one thing at a time and retesting until I came up with this recipe. I played with flours, adjusted ingredients and rising times and even tested different pan sizes and shapes. What resulted was my final gluten free brioche recipe.
I always like to share the process with you in case you’re interested. I believe that understanding what goes into a recipe and why helps you use the recipe for a springboard in case you want to go off and come up with your own creation. That’s especially true for any gluten free brioche recipe you might like to try.
The Ingredientsfor gluten-free brioche
Brioche is yeast bread that is enriched with butter and eggs. Use the best butter you can get or, if you’re dairy-free, use a good quality butter substitute. The eggs actually add a lot of flavor so again, use really good eggs. I prefer to use organic, cage-free, pastured eggs, from chickens fed with pure grains with no animal fats or by-products. These all really matter when it comes to flavor in this gluten free brioche recipe.
Brioche is also a little sweet. I made the bread with agave, honey and sugar. As much as I wanted the agave recipe to be the best, the one with sugar won the blind taste tests. But if you don’t eat refined sugar, agave is a great substitute. Honey came in third but still made an awesome loaf of bread. These variations can be used in a gluten free brioche recipe to suit your taste.
To keep the bread light enough in texture, it requires starch. I tried potato, tapioca and a combination of the two. Tapioca starch alone produced the best crumb. This is a key tip for any gluten free brioche recipe you try at home.
To make the bread a little denser and to add some whole grain goodness I used superfine brown rice flour. I actually didn’t test it with white rice flour but making an educated guess I would say it would work just fine as long as it is super fine. What I wouldn’t use is brown rice flour that isn’t milled really finely; I think it would be too heavy.
The Appliances & Pans
I tried making the dough in a stand mixer with the whisk and paddle attachment and in the food processor. They all worked but the easiest was using the stand mixer with the paddle attachment. I didn’t try mixing by hand, I love you all very much but I am way too lazy to mix dough with a spoon. You could do it if you put some elbow grease into it. The technique works well whether you follow my gluten free brioche recipe or use another version.
Loaf pan size seemed to make a difference, the best was an 8- by 4-inch loaf pan, the bread rose higher and the sides were straighter. Since my husband likes a high crust ratio I tried baking it in a ring mold – it was ok by a little dry. Letting the bread cool in the pan after baking is essential, the added structure of the pan helps the sides not cave in.
Technique Tips
One of the challenges was getting a deep brown crust and having the inside of the bread not come out too wet. Making a ¼ deep slit down the middle (lengthwise) of the loaf helped allow steam to escape while baking handling the wetness, and doing a double coating of egg wash (an egg beaten with about a tablespoon of water) and baking the bread in the lower third of the oven produced a beautiful crust. Before baking I brushed the top of the loaf with egg wash, let it sit for 5 minutes and then brushed it again. These details will perfect your gluten free brioche recipe at home.
You don’t want to rush this recipe – when blending in the butter, take your time. Blend the butter in 1 tablespoon at a time until it is fully incorporated. Don’t try to hurry this along with melted butter (tried that!) believe me when I say this makes all the difference. Take the time to let all your ingredients come to room temperature first, the eggs and butter need about half an hour. And this recipe requires two risings. It seems that I could be a little loose with rising times. Two hours seemed perfect for the first but once I forgot and it rose for almost an hour longer, everything was fine. I also tried doing a long second rise in the fridge overnight and to my delight, it worked great! Such a great thing if you want to have freshly baked bread in the morning! With all these steps, your gluten free brioche recipe will be a success.
After I perfected the recipe I tried doubling the recipe because heck, if you are gonna make bread why not make 2 loaves instead of one? It worked perfectly! I even tried using the dough for a simple cinnamon bun – more on that in a later post.
The really great news is that while coming up with the recipe was complicated; the recipe itself is very straight forward and simple. Yes, it takes a little to make the dough and then there are those two risings but it is not at all difficult and it rises unattended.
Shop This Post


Gluten Free Brioche Recipe
Ingredients
- 1 tablespoon dry active yeast
- 5 tablespoons sugar, (or agave nectar or honey)
- ¼ cup warm, (not hot) water
- 2/3 cup superfine brown rice flour
- 1 cup tapioca starch
- 2 teaspoons xanthan gum
- ¾ teaspoon kosher or fine sea salt
- 4 large organic pastured eggs – use divided
- 9 tablespoons unsalted butter, (or dairy free butter) at room temperature – use divided
Instructions
- Combine the yeast, 1 tablespoon of sugar and warm water in a small mixing bowl and whisk to combine. Let sit until the mixture is foamy, about 6 minutes.
- In the bowl of a mixer whisk together the brown rice flour, tapioca starch, remaining 4 tablespoons of sugar, xanthan gum and salt. Make a well in the center and add the yeast mixture. Put the bowl in the mixer and mix on low speed to combine. Add 3 of the eggs, one at a time, mixing each egg in thoroughly. Add 8 tablespoons of butter, one tablespoon at a time, mixing after each addition until the butter is fully incorporated. Increase the speed of the mixer to medium and beat for another minute or two until the dough is smooth. Scape the dough into a clean mixing bowl, cover with a tea towel and let sit in a warm, draft free place until it has doubled in size, about 2 hours. If it looks a bit more than doubled, that’s ok.
- Butter an 8- by 4-inch loaf pan with the remaining tablespoon of butter. Make sure you really coat the pan well. Scrape the batter into the prepared pan and smooth into the pan evenly. With a wet spatula, smooth the top. Cover with a tea towel and let rise for 45 minutes. (To do a cool rise in the fridge, cover the pan with a tea towel and let rise in the refrigerator from 2 to 24 hours. When ready to bake, uncover the pans and let the pans sit at room temperature for 15 minutes while the oven preheats.)
- Place the rack of the oven in the bottom third and preheat to 350 degrees.
- Cut a slit about ¼ inch deep down the center of the loaf with a sharp knife or razor blade dipped into some tapioca starch. Mix the remaining egg with 1 tablespoon of water, whisking well. Brush the mixture onto the top of the loaf, let sit for 5 minutes then brush again with the egg wash. Bake for 40 – 45 minutes or until the bread is deeply golden brown and the bread sounds a little hollow when tapped. Let cool in the pan for 15 – 20 minutes.
- The bread stays moist for several days. Wrap well in plastic wrap and store in the fridge.
Notes
Nutrition
Nutrition information is automatically calculated, so should only be used as an approximation.


My grandchildren are coming to visit (they eat gluten free for health reasons) and I am terrified about cooking gluten free! When making this recipe, can I use GF all purpose flour? Do I need xanthan gum or is it part of the flour?
Hi Diane,
Don’t be terrified; you can do it! Just a couple tips if you haven’t cooked GF for them before – make sure everything is cleaned well before you start baking/cooking to avoid cross contamination and avoid dipping a utensil into one container and then the other if one might have gluten in it, especially with condiments, etc.
For this recipe, yes you can use a GF all purpose flour, just make sure it’s a good quality one. Check the label and see if it contains xanthan gum in the ingredients. If so, no need to add any. If not, you’ll want to include it. Hope this helps! Have fun with your grandchildren :)
xo,
Carol
I’ve been making your brioche for several years now -it’s such a treat. I put sultanas in prior to the last rising – delicious!! Thanks for so much delicious pleasure!!
Thanks, Ian! Glad you like it!
I love this Brioche Bread, I have a allergy to cows milk so I use Goat or Buffalo Butter and the bread comes out so good. I added 8 tablespoons of sugar as I like dessert breads for breakfast and the extra sugar didn’t bother the bread any was very good. I use Bobs red mill 1 to 1 baking flour 1 cup and 2/3 cup and it’s amazing.
Reading this and all the comments I cannot wait to try the recipe out for myself (and my celiac boyfriend)! I have been looking for a good recipe for cinnamon rolls and other things like it and wonder if this would work?
Best wishes, Michelle
Hi Michelle,
Yes, you could most likely make some cinnamon rolls with this. That sounds delicious!
Let me know how it goes.
This is an amazing recipe!!! So easy and so delicious. We ate some warm out of the oven and used the rest for bread pudding. Even my non gluten-free family members asked for more. I’ve been gluten free for 12 years and have never had such a delicious gluten free bread. Thank you!
Wow, I tried this recipe for the first time today using the metric conversion on your page. It was so easy and turned out great!
Thank you for this recipe! I will be making it again soon as half of my loaf already is eaten which is proof of how delicious it is.
Thanks Michelle! Glad you like it!
Hi! I would like to try your recipe… I’m now over 2 years GF, first 18 months I just resisted to bake as every time I tried it was a disaster…
6 months ago I started baking with more disasters than successful loafs, so I started adapting recipes till get good results…
I need a good brioche recipe urgently and your seems good in structural ingredients…I’m convinced that using cups will never give a good result (after trying several times)… When I use the convertor it turns out that the recipe contains 14 gr dry yeast! That is quiet a lot for only 250 gr flour….for regular bread I would use 4-6 gr… Is that conversion accurate?
Hi Nathaly,
The conversion function on our recipes is from a recipe plugin and it definitely has its flaws. It basically gives you a standard conversion from cups to grams of dry ingredients, so in other words it would likely give you a similar amount for 1 cup flour and 1 cup chopped almonds, but those won’t necessarily weigh the same. It’s something we are looking into with the developer of the recipe plugin to get corrected, so in the meantime I would suggest looking up each ingredient, like “tablespoons to grams dry active yeast” or “cups to grams gluten-free flour” into Google and you should find a more accurate conversion. Another option is to look on the package of flour/yeast/etc. – it will usually give you a serving size in both tbsp/cup and grams.
I’m sorry for this inconvenience. Please let us know if you have any other questions. This bread is a reader favorite, so I hope it works well for you!
Hi, thank you for the recipe, I had such hope for it! As a few other users commented, I too found it didn’t rise. Can’t figure out where I went wrong. To me the recipe seemed to have too little liquid to activate the yeast? I used instant yeast, so I mixed the yeast into the dry ingredients then added the water with the first egg. Here’s hoping it rises in the oven! If you have any ideas let me know. Thank you :)
Also – I used the metric converter, maybe some problem there (too much sugar, ate up the water?)
Hi Naomi,
See my reply about the yeast type in your previous comment. But yes, the metric converter is not very accurate and we have contacted the developer of the plugin that we use for our recipe template to ask them to make corrections on their converter function. It gives a standard, across the board conversion of cups/tbsp/tsp to grams – regardless of what the dry ingredient is, which is not correct. A cup of flour is going to weigh different in grams than a cup of chopped almonds, for example, so we’ve pointed this out to them and hope to have a fix soon.
Hi Naomi,
The recipe calls for dry active yeast, which is different from instant because it needs to sit in warm water for a few minutes.
An update to this, the brioche rose in the oven and it came out delicious, will definitely make again, thank you!
Re instant yeast – I’m not sure why it didn’t rise, should work really
Hi Carol
Thank you for this fantastic post. I am not good at following instructions so the amount I used weren’t so accurate :P but it turned out great. I used buckwheat flour and potato starch and both a bit more? I used 4 +1 eggs instead of 3+1. Used a bit more yeast. Only used roughly 25g of butter and I melted it before I read your technical tips so :P will try with room temp next. I used gelatine granules instead of xanthum gum. I didn’t melt the gelatine and was hoping that’ll work and it seemed perfectly fine. I don’t have a machine so used handheld dough mixer for this. I roughly split the whole batter paste into two parts and added wheatgrass powder to one for it to be green. The white and green cross section is so beautiful! I used a Pyrex measuring jug as the mould :)
The texture is just amazing. Thank you so much!
Glad you like it! And thanks for the notes – it’s always helpful when readers tell us how they made adjustments, it lets other readers see what they might be able to try!
I followed this recipe strictly and the brioche turned out beautifully. It was golden brown, had a porous and light texture. My family devoured it at one sitting. Thank you Carol for this wonderful recipe and sharing your tips!
The only deviation was that I did only one proofing because the dough already had many pock-mark at the end of 60min. The top started to get very brown with 18min remaining, so I covered it with an aluminium foil and it worked perfectly.
Hi from Switzerland! My gluten free journey has just begun and I’m so delighted to have found recipes like these already. The pictures speak for themselves. Amazing!!! I followed the recipe for the most part exactly. Here are my changes:
I used fresh yeast instead of packet, i substituted 10gr for one teaspoon. Since it’s fresh, I didn’t let it foam. I did however mix it with the warm water prior to mixing it in. I would like to try packet next time and see if there is a difference.
I accidentally put the 9 tbps of butter in the batter! While the brioche was still a bit warm, it was a bit moist on the inside (maybe the extra butter) anyway this morning it is absolutely delicious.
I didn’t have a loaf pan so I used a ring mold, I had read that it had come out dry for you. So I actually ended up baking it for 20 mins exactly (at 350 f) and it was perfect!
Thank you so so much for having have put the time and energy into this wonderful recipe. I will keep it for a lifetime!!!