Gluten Free No Bake Sunbutter S’ Mores Bars Recipe
Updated May 29, 2020, Published Sep 24, 2013
This post contains affiliate links. Please see our disclosure policy.
Ever seen that show on the Discovery Channel called Naked and Afraid? Every week a couple of strangers (one man and one woman) are plopped down in a hostile environment for 21 days and must learn to survive together with no food, water, tools, or clothes. Even the thought of doing something like this is so far out of my comfort zone it hasn’t even been charted on my comfort zone map.
I know that I if I were in that position I should concentrate on essential things such as how to find water, food, and shelter. How to fashion something to wear out of leaves or whatever. How to avoid snakes. How to, you know, survive.
Sadly when I imagine myself on the show I don’t think of any of that – I fixate on my feet. What would my feet look like after 21 days of running around in rugged terrain with no shoes? I am certain that my heels would be dried and cracked like crocodile skin. My toenails would be broken and jagged and the polish would be grown out and chipped.
For years now I have afforded myself the one indulgence of getting a pedicure every two weeks. It is 45 minutes twice a month where I can relax, get a little pampering, read magazines and at the end my feet are smooth and soft and my toenails are pretty. I like that. I like smooth heels and pretty toenails.
Obviously I am not the kind of person who should be running around in the wilderness naked, unequipped, and barefoot. My survival potential would be pitifully low.
This week I had my toenails painted light blue. Blue nail polish has been all over the magazines and many of my friends have been sporting this trend and their feet look lovely and stylish. Blue nail polish is quite outside my comfort zone. I am good with reds, corals, pinks, and even those really dark crimsons that look almost black. But I tried the blue anyway.
I hate my blue toenails. Every time I look down at my feet I think “This is what my toenails would look like if I were on Naked and Afraid and was dropped down naked in Antarctica and was literally freezing to death.” Scary!
Am I upset that I plopped down $20.00 for a pedicure and hate the way my toenails look? No, I stepped outside my comfort zone and for that I am sort of proud. How would I have known if I hadn’t tried?
Does this mean I am even remotely ready for something like Naked and Afraid? Heck NO!
Blue nail polish I can handle, eating raw snake meat and wearing a bikini made of poison oak leaves– not so much.
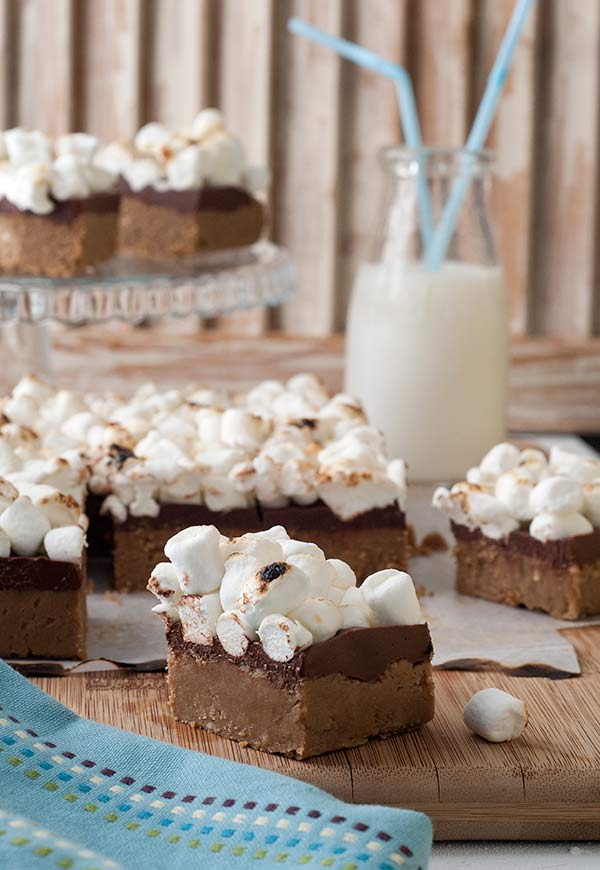
These Gluten Free No Bake Sunbutter S’ Mores Bars are totally in my comfort zone and are going along way towards making up for the blue toenails. It is super easy to make, contains only a handful or so of ingredients and has the flavors of one of my all-time favorite things – S’ Mores!
In case you are wondering what this recipe has to do with the show Naked and Afraid let me explain – the show is basically very, very extreme camping. I can’t think of camping without thinking of S’ Mores. That’s not such a stretch, is it?

Gluten Free No Bake Sunbutter S’ Mores Bars Recipe
Ingredients
- 1 ¼ cups creamy Sunbutter, divided use
- 1 cup unsalted butter or dairy free butter substitute
- 2 cups gluten free graham style cracker crumbs
- 2 cups powdered sugar
- 2 teaspoons vanilla extract
- 1 ¼ cups semisweet chocolate chips or dairy free chocolate chips
- 2 ½ cups mini marshmallows
Instructions
- Line a 9 by 9 inch baking pan with parchment or wax paper cut so that it sticks up over the edges of the pan by a couple of inches on each side.
- In a saucepan, melt 1 cup of Sunbutter and the butter. Stir until smooth and remove from the heat. Stir in graham style crumbs, powdered sugar, and vanilla until well combined. Pour the mixture into the prepared pan and smooth the top.
- Combine the remaining ¼ cup of Sunbutter and the chocolate chips in a microwave-safe bowl. Microwave for 1 minute, stir and if the Sunbutter is not fully melted, continue to microwave fat 20 second intervals, stirring after each 20 seconds. Once smooth, pour the mixture over the Sunbutter layer and smooth the top. Cover the chocolate layer with the marshmallows. Preheat the broiler broil for about 1 minute or until the marshmallows start to brown. Refrigerate for 20-30 minutes to set up. Remove from the pan, cut into 16 bars (2¼ inches by 2¼ inches). Serve or store in the refrigerator, covered.
Nutrition
Nutrition information is automatically calculated, so should only be used as an approximation.
The views and opinions expressed on this blog are purely the blog owner’s. This blog accepts free manufacturers’ samples and forms of cash advertising, sponsorship, paid insertions or other forms of compensation. Affiliate links may be included in this post.


Oh my goodness, my kids would love these! Great recipe Carol :) Total comfort food. Sorry to read about your dislike for your blue toes! But I do love reading about your pedicure habits. I loooove a pedi!
Thank you Maggie! Wish we lived closer we could get a pedi together :)
These are DANGEROUS. SO delicious!
Hi Liz!
haha! That’s a good way to put it! Thanks!
xo,
Carol
Where can you find gluten free graham crackers??
Schar! Here’s the link, they’re great!
https://www.schar.com/en-us/products/us-cookies/honeygrams
xo,
Carol
Thank you for this recipe – these are absolutely divine! I made a dairy-free version using Earth Balance sticks and crushed Annie’s Cocoa & Vanilla bunnies. I also make it in a rectangular pan vs. square as I find they are so rich, the thinner, the better :-) I’ve made them for several gatherings and now it’s always the requested dish!