
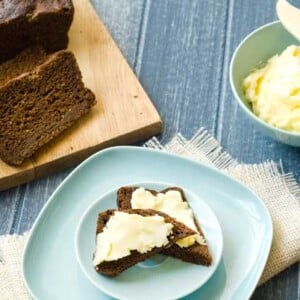
Gluten Free Pumpernickel Bread and Homemade Butter Recipe
Updated Apr 02, 2020, Published Mar 06, 2012
This post contains affiliate links. Please see our disclosure policy.
It can be funny how one thing leads to another. A couple weeks ago I was organizing my pantry late at night (doesn’t everyone organize the pantry late at night?) and pulled out a bottle of molasses. The molasses got me thinking about gluten free gingerbread houses, molasses cookies and then, oddly enough, pumpernickel bread. I was sure I had read in one of my many cookbooks that one of the ingredients that contributes to the dark intensity of pumpernickel bread was molasses along with unsweetened chocolate. Hmmm, low and behold right next to the bottle of molasses was a can of unsweetened cocoa powder. And so it began… pantry organization was abandoned in favor of midnight bread baking.
While waiting for the bread to bake I started thinking of what I would like to eat on my gluten free pumpernickel bread and the obvious choice was butter. But I was out of butter. Hmmm, could I make butter?
I am no farm girl – but my father took me to his grandparent’s farm once, and the whole way there he spoke lovingly of fresh milk right out of cow. My husband who spent summers at a relative’s farm also waxes poetic about milk straight from the cow. Well, I had a taste and let me just say this – I am pretty sure that the person who discovered drinking milk straight from the cow was probably the same person who invented the word “yuck!” The milk was warm and tasted like grass. So, as you can see, churning butter is probably not something I am preconditioned to be able to do. Fortunately I have a good stand mixer so no churning was involved and I used COLD dairy products which did NOT taste like grass or clover or anything else green.
I may be experiencing a twinge of guilt including a homemade butter recipe with a dairy free bread recipe but not guilty enough not to do it! This warm gluten free pumpernickel bread spread with homemade butter was a little slice of heaven! For my dairy free readers, it is pretty amazing with some dairy free cream cheese and smoked salmon. It is also pretty darn good all by its lonesome.
Since pumpernickel is supposed to be a dense, substantial bread, I used a combination of superfine brown rice flour from Authentic Foods and sorghum flour along with some tapioca starch. I also added a super-secret pantry item I keep well hidden way, way in the back of the pantry – gluten free instant mashed potato buds. In my own defense, I would never, EVER make mashed potatoes with them but I do keep it on hand as a gluten free flour substitute for making potato pancakes and for breading fish. If you don’t keep a secret stash of potato buds in your pantry, just boil up a potato or two, mash it up and use that instead. I added some rich and robust organic molasses from Wholesome!, unsweetened cocoa powder, caraway seeds and a few more pantry items. This recipe makes 2 loaves of bread which is good because it takes no more time to make two than it does to make one and the bread keeps well and can even be frozen.
The next time I can’t sleep I’ll get back to that pantry but it certainly won’t compete with excitement of making (and eating!) warm-from-the-oven gluten free pumpernickel bread and homemade butter!

Gluten Free Pumpernickel Bread and Homemade Butter Recipe
Ingredients
Pumpernickel Bread
- 2¼ teaspoons dry active yeast
- 1¾ cups warm, (not hot) water
- 2 tablespoons brown sugar
- ¾ cup brown rice flour
- ¾ cup sweet sorghum flour
- 1 cup tapioca starch
- ½ cup gluten-free corn meal
- 4 teaspoons xanthan gum
- 2 tablespoons unsweetened cocoa powder
- 4 teaspoons kosher salt
- 2 teaspoons caraway seeds
- 1 teaspoon onion powder
- 2/3 cup plus 2 tablespoons boiling water
- ½ cup gluten free instant mashed potato buds
- 1 tablespoon olive or vegetable oil
- 1 teaspoon apple cider vinegar
- ¾ cup organic molasses
- Gluten-free nonstick cooking spray
- 1 large egg white, (omit for egg free)
Homemade Butter
- 2 cups heavy whipping cream
- 1 cup full fat natural sour cream
- *1/2 teaspoon kosher salt, (optional)
- Ice
- Water
- *if you want to use or drink the buttermilk, , which is a natural byproduct of making butter, omit the salt otherwise the buttermilk will be too salty.
Instructions
Pumpernickel Bread
- Whisk together the yeast, warm water and brown sugar in a small mixing bowl and let proof for 10 minutes.
- Combine the brown rice flour, sweet sorghum flour, tapioca starch, corn meal, xanthan gum, cocoa powder, salt, caraway seeds and onion powder in the bowl of a stand mixer. With regular beaters (not a dough hook), mix on low speed to combine the ingredients.
- Combine the boiling water with the potato buds and let sit for 30 seconds then whip with a fork. (Alternatively you can just use 1 cup of mashed potatoes). Add the potatoes to the flour mixture along with the yeast mixture, apple cider vinegar, oil and molasses. Start the mixer on low then increase speed to medium and mix for 2 minutes, scraping down the sides of the bowl with a spatula if needed.
- Spray two 8- by 4-inch loaf pans well with gluten-free, non-stick cooking spray. Divide the batter evenly among the prepared pans and smooth the tops. Cover with a clean tea towel and let rise in a warm, draft free environment for an hour or until the batter is level with the top of the pan. Make 2 or 3 diagonal slashes with a sharp knife on the top of the loaves to allow steam to escape. Mix the egg white with a tablespoon of water and brush on the tops of the loaves (omit for egg free).
- While the loaves are rising, preheat the oven to 375 degrees. Bake the loaves for 55 – 65 minutes or until the crust is browned and the bread makes a clicking sound when tapped with your fingernail. Do not undercook the bread or it will be too moist inside. If the tops of the loaves are browning too quickly, cover with a piece of foil.
- Let cool in the pans.
Homemade Butter
- Combine the cream, sour cream and salt (if using) in the bowl of a stand mixer. Start on low and gradually increase speed to medium-high. Mix until the butter starts to separate from the buttermilk, about 3 - 4 minutes. The buttermilk may splatter as it begins to separate and the butter starts to form.
- While the mixture is mixing combine some ice and cold water in a large mixing bowl. Once the butter is done, gather it up into a ball in a clean tea towel, twisting the towel gently. Submerge the towel into the ice bath and swish it a few times to wash any remaining buttermilk from the surface. Unwrap the butter from the towel and place in a serving bowl. The butter is best used at room temperature. Can be stored, covered, in the refrigerator for up to 2 weeks.
Nutrition
Nutrition information is automatically calculated, so should only be used as an approximation.


I like this recipe but the dough came out very liquid. Is this expected? Also, it was rising beautifully but when I put it in the oven (it had just reached the edge of the pan), the volume went down quite a bit and never came back up. Any suggestions?
Hi Alison,
I’m sorry this didn’t turn out right for you. Let’s see if we can troubleshoot this … what kind of flour did you use exactly? And was your yeast fresh?
Hi Carol,
I’m using King Arthur Bread Flour and it is rising like it is supposed to, but when it bakes it drops down. My loaves are only about 3″-3 1/2″ tall. What can I do to fix it?
Hi Cindy,
Was the bread sticky in the middle? If so, then try reducing the liquid by 1/4 cup – humidity levels may be making the batter too wet. Then, reduce the temperature by 25 degrees and bake the bread a little bit longer.
Let me know if this helps!
xo,
Carol
Thanks Carol! Trying it now. I also added a tiny bit of flour on the outside to help shape it. The last 4 I did were pretty rough looking. Hoping this will help it look pretty!
Much better flavor and texture, but still didn’t rise much.
Hi Carol,
I did as you suggested. For some reason it drops back down while baking. I am going to use all the ingredients and do one loaf. Flavor on this is amazing and the texture is great, I have to get 5 loaves done today and since I can’t figure out how to make this work as two loaves, I’m going to pray it works as one.
Thank you so much for your help!
Cindy
Hi Cindy,
Hmm… ok, well keep me posted and let me know how it turns out. The only other thing I can think of at the moment is to ask if your yeast is fresh and not expired (or close to expiration)?
Yeast is new. I’ve kept it in the fridge. Large loaves turned out perfect! They take about 40 minutes to bake. Crusty top and soft inside. Wish I could upload a photo for you to see.
Thank you for all of your help!
Cindy
I’m so glad to hear that! :)