Gluten Free Paleo Banana Bread in a Jar
Updated Feb 15, 2021, Published Dec 02, 2015
This post contains affiliate links. Please see our disclosure policy.
Yes, it is that time of year to start putting in some serious thought to gift giving.
Maybe you have already gotten started on your holiday gifts – if so, then I envy and admire you.
I like to give gifts I make myself in my own kitchen. It just feels like such a lovely way to share the love. And if those homemade treats are on the healthier side (without being obviously so), that’s even better!
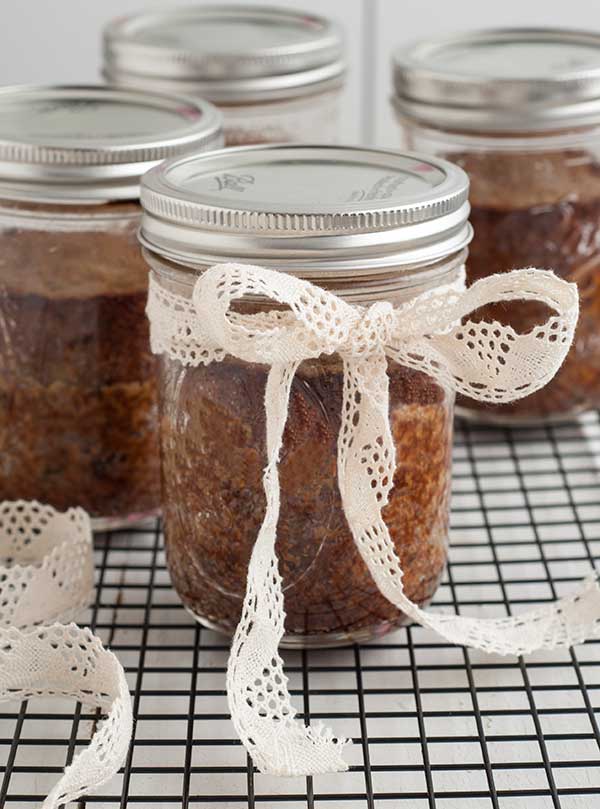
I love these gluten free Paleo banana breads baked in a jar. Delicious little banana breads in a really cute package (that is reusable) make a delightful hostess gift or are great for adding to a basket filled with goodies.
All you need to add to these is a cute little ribbon. And unless you feel the need to mention it, you don’t even have to say they are gluten, grain, dairy, and refined sugar free! They are so tasty, no one will know or care.
Notes: You need to make sure your Mason jars are straight sided and wide mouthed – otherwise you won’t be able to easily get the bread out of the jar. I use cage free, pastured eggs (such as from Nature’s Yoke) and make sure your almond flour is gluten free.
Click here to see my cooking demonstration of this recipe on Daytime TV!

Gluten Free Paleo Banana Bread in a Jar
Ingredients
- 8 straight sided, wide mouth pint Mason jars with lids and rings
- Gluten-free non-stick cooking spray
- 6 ripe bananas
- 8 large cage free eggs
- 1 cup unsweetened almond butter
- 1 cup blanched, finely ground almond flour
- 6 tablespoons coconut oil
- ½ cup honey
- 2 teaspoons pure vanilla extract
- 2 teaspoons baking powder
- 1 teaspoon baking soda
- 2 teaspoons kosher or fine sea salt
- 1 cup chopped walnuts
Instructions
- Preheat the oven to 325 degrees. Spray the jars with cooking spray.
- In the bowl of an electric mixer, preferably fitted with a paddle attachment, beat the bananas until smooth. Add the eggs and beat until fully incorporated, scraping down the sides of the bowl as needed. Add the almond butter, almond flour, coconut oil, honey, vanilla, baking powder, baking soda, and salt. Beat until all ingredients are fully incorporated, scraping down the sides of the bowl as needed. Stir in the chopped walnuts.
- Fill the jars half full with the batter, making sure to wipe the top of the jars clean of any batter. Place the jars directly on the rack of the oven and bake for 40 to 45 minutes or until a toothpick inserted into the center comes out mostly clean.
- While the bread is baking, place the lids and rings for the jars into boiling water and let boil for 3 minutes. Remove from the boiling water, let cool, and dry well.
- When done baking, remove the jars from the oven and place on a counter. Top with the lids and rings and let cool. The jars will seal as they cool. Once completely cool, eat immediately or store in the refrigerator for up to one week.
Nutrition
Nutrition information is automatically calculated, so should only be used as an approximation.
The views and opinions expressed on this blog are purely the blog owner’s. This blog accepts free manufacturers’ samples and forms of cash advertising, sponsorship, paid insertions or other forms of compensation. Affiliate links may be included in this post.


This is a fantastic idea– my son would love to give these as party favors for his birthday. Can you use any of your gluten free nut breads and make them in jars? He wants to make a variety of them but I’m not sure it will work with the other recipes.
Hi Toby,
Yes of course. That’s a great idea!
xo,
Carol
This is a fantastic idea! I am certainly going to try this. I was wondering after the jar seals what the shelf life would be if not refrigerated considering it should be airtight and sterile?
Hi Andrea,
I’m glad you like it! It’s a fun recipe! I’m not a canning expert, so I hesitate to give advice on this. I have had mine not refrigerated for 24 hours and it was fine, but again I’m not an expert on that. Here’s a link that might help give you a more definitive answer.
xo,
Carol
hello all sounds good how do i get it out of the jar.
Run a butter knife under hot water, dry it off, then use that to loosen the sides of the bread and shimmy it out of the jars. You can also eat the bread directly out of the jar with a fork, like cake. Make sure to use wide-mouth jars for this recipe so you can get the bread out easier.
Good recipe.
But, although baked in a canning jar and vacuum-seal as it cools, IT HAS NOT GONE THROUGH THE CANNING PROCESS AND THEREFORE IS NOT SHELF STABLE AND WILL DEVELOP FOOD TOXINS AND POISONING.
That is according to oversight Universities and Government Agencies.
Treat canned cakes and breads as you would if baked in a pan and safely enjoy.
Hi CJ,
The instructions say to store in the refrigerator. I’m no canning expert so anything I make that is jarred is typically going to be stored in the refrigerator. The vacuum seal allows them to transport well and stay fresh longer than they might in a pan and they are packaged in a nice presentation for gift-giving in the jars.
But what size jars are we using, pints? I would love to make these. Thanks for sharing such a great treat.
Hi Patricia,
Yes, pint size!
Can this recipe be baked in small loaf pans instead of jars??
Hi Janice,
Yes, they can. They will likely need to bake longer, so check them after the original baking time and then bake for additional time, as needed, in 5 minute increments.
bake how long for a Quart size?
Hi Hannah,
I don’t recommend using quart size jars unless they are completely straight-sided. The wide-mouth pint jars are straight all the way down, but the quart size typically has a very slight curve at the top, which will likely make it difficult to get the bread out of the jar. If you have quart size jars that are straight-sided, I’d suggest baking for the same amount of time, then check them and bake for an additional few minutes at a time until done.