Gluten Free Vegan Garlic Herb Cheese Spread Recipe
Updated Jun 11, 2018, Published Jun 05, 2013
This post contains affiliate links. Please see our disclosure policy.
Lately I have been consumed with the idea of making my own cheese. It started with homemade ricotta (easy peasy and for my dairy eating readers) and then I decided to try my hand at vegan nut cheese.
What I was after was a garlicky, herby, spreadable cheese that would be good for entertaining not just vegans but anyone.
I didn’t invent this method by any means. I got the idea from my friend Lexie who got it from someone who got it from someone else who got it from someone else… and so it goes with recipes; people take them and make them their own.
Making nut cheese is ridiculously easy. It is a little time consuming as you have to wait while your nuts soak and then wait for your mixture to culture and then finally wait for all the flavors to meld in the fridge. But it is not like you are doing anything when waiting. Unless you are me who has to peek at it every few minutes in case I miss some strange and miraculous occurrence. For the record you can skip the peeking, absolutely nothing appears to be happening. Notice I say “appears” – stuff happens you just can’t see it.
The basic recipe for cultured cashew cheese is just raw cashews, water, and probiotics. Some recipes call for rejuvelac which is a fermented liquid that typically contains gluten in it. I just used water – simple!
If you can buy cashew pieces instead of whole, do it. They are typically cheaper and you are just going to grind them up anyway. You can soak your cashews anywhere from 4 to 12 hours. I (being impatient) opted for 4 hours. No idea if this makes any difference in the overall product.
You need probiotic capsules. Make sure they are allergen free and shoot for having something around 10 – 15 billion organisms total.
If you have a high speed blender like a Vitamix, great. If not, don’t worry you can still make this with a regular blender it will just take a little more work to get your mixture really smooth. Just keep scraping and blending, you will get there.
When blending the cashews, try to use as little water as possible. Start with a little and just add a bit each time until the mixture is really smooth. This is really the only step that requires just a touch of patience – well except for the waiting part.
You can “culture” your cheese (don’t get scared, all that means is just let it sit) for 14 – 16 hours or longer if you want a “riper” cheese. I was trying to combat the natural sweetness of cashews so I actually let my cheese ripen for 24 hours. At least that’s the story I will stick with, actually I just sort of forgot about it for a little bit.
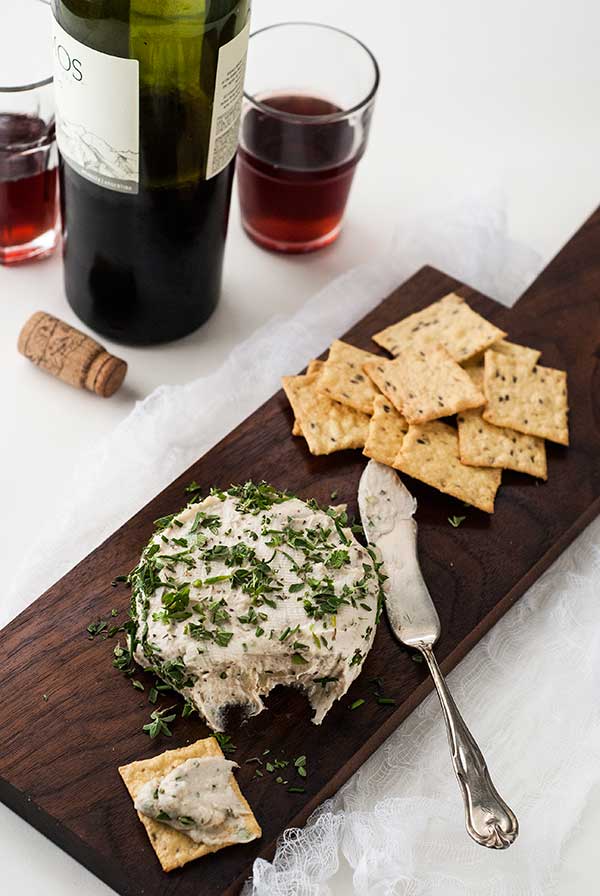
At this point you can form into rounds and let harden in the fridge as it. As I said I was looking for an herby, garlicky spread so I doctored it up with lemon juice, a touch of vinegar, some nutritional yeast, salt, pepper, garlic, and herbs. I used a combination of fresh thyme, chives, oregano, and parsley but you could use the herbs you prefer and if you don’t have fresh, dried will work well too.
Oh, and you need some cheese cloth. Duh!
The verdict? I really like this Gluten Free Vegan Garlic Herb Cheese Spread! I can eat dairy and I would still eat this. Is it exactly like “real” cheese made with dairy? No. But that does not mean it is not fabulous. Everyone at the office who tried it liked it and I would certainly serve this at a party.

Gluten Free Vegan Garlic Herb Cheese Spread Recipe
Ingredients
- 3 cups raw cashews
- 3 probiotic capsules
- ½ cup water, more or less
- 2 teaspoons lemon juice
- ¾ teaspoon white wine vinegar
- 1 tablespoons fresh herbs, minced, plus more for coating, if desired
- 2 large cloves garlic, or more if you like, grated or finely minced
- 2 green onions, finely minced
- 1½ teaspoons kosher or fine sea salt
- ¾ teaspoon freshly ground black pepper
- 2 teaspoons nutritional yeast
Instructions
- Soak the cashews in clean, cool water for 4 – 12 hours. Drain well. Put in blender with the powder from the probiotics (discard the casings) and a little water. Blend until smooth, adding water a little at a time to keep things moving and blending. Use only as much water as is needed for a smooth texture.
- Line a colander with a double layer of cheesecloth and place over a bowl. Scrape the cheese mixture into the cheesecloth, cover with cheesecloth and then place a towel over the whole thing and let sit in a warm spot in your kitchen for 12 – 24 hours. The longer it sits the more tart it becomes.
- Put the cheese in a mixing bowl, stir in the rest of ingredients except for the herbs for coating. Transfer mixture to an airtight container and let firm up in the fridge for a few hours.
- If you want, you can “mold” your cheese. Line 2 ramekins (8 ounces each) with cheesecloth or plastic wrap, fill with the cheese, cover and refrigerate for several hours. Unmold the cheese and press minced herbs into the sides and on top. It will be on the soft side, similar to Boursin Cheese.
- Cheese keeps for 3 – 4 days, in airtight container, refrigerated.
Nutrition
Nutrition information is automatically calculated, so should only be used as an approximation.
The views and opinions expressed on this blog are purely the blog owner’s. This blog accepts free manufacturers’ samples and forms of cash advertising, sponsorship, paid insertions or other forms of compensation. Affiliate links may be included in this post.




This cheese looks beautiful Carol! Great pictures :) I love nut cheese, but do get impatient when it comes to the waiting part! It’s so worthwhile though. I like to use my leftover nut pulp, from making cashew milk. It’s a good way to use it up. Thanks for the inspiration!
Thanks Maggie. I am noew to this but love it!
I am allergic to tree nuts, but can have peanuts and almonds. Can I substitute either of these for the cashews? Also, I currently take a non-dairy probiotic daily. Will this work as well?
You can use almonds. Rub the skins off of them before griinding. It will have more distinct flavorbut still delish! I am not sure about peanuts.
Lovely, just lovely Carol! I’m really into the cashew cheeses and can’t wait to try this one!
Thanks Alisa – so easy! Enjoy.
Beautiful… I love this. I am definitely going to try this for my next girl’s night coming up since all of my friends seem to be free of one thing or another…and most of them don’t eat dairy! :D Gorgeous photos, as usual, too! XO
Thanks Kim. Wish we lived closer – then maybe I would get an invite to girl’s night at your place :)